
Logging and Tracing
Logging Options
Only enable logging long enough to capture information required to resolve an issue. Logging decreases performance and can consume a large quantity of disk space.
If logging is enabled, the Drill ODBC driver logs events in the following log files in the log path that you configure:
driver.logprovides a log of driver events.drillclient.logprovides a log of the Drill client events.
Logging Levels
The following log levels are available:
- (0) OFF: Disables logging.
- (1) FATAL: Logs severe error events that may cause the driver to stop running.
- (2) ERROR: Logs error events that may allow the driver to continue running.
- (3) WARNING: Logs events that might result in an error if action is not taken.
- (4) INFO: Logs general information that describes the progress of the driver.
- (5) DEBUG: Logs detailed events that may help to debug issues.
- (6) TRACE: Logs all driver activity, which includes more fine-grained events than the DEBUG level.
Non-Windows Platforms
On non-Windows platforms, logging is configured through the driver-wide settings in the mapr.drillodbc.ini file, which apply to all connections using the driver.
Enable Logging
To enable logging:
-
Open the
.mapr.drillodbc.iniconfiguration file in a text editor. (On Mac OS X, the default installation will install a .mapr.drillodbc.ini to $HOME.) -
Set the LogLevel key to the desired level of information to include in log files. For example:
LogLevel=2 -
Set the LogPath key to the full path to the folder where you want to save log files. For example:
LogPath=/localhome/employee/logs - Save the
.mapr.drillodbc.iniconfiguration file. The Drill ODBC Driver produces two log files at the location you specify using the Log Path field:driver.logprovides a log of driver activities.drillclient.logprovides a log of Drill client activities.
- Restart the applciation to make sure that the new settings take effect. Configuration changes will not be picked up until the application reloads the driver.
Disable Logging
To disable logging:
- Open the
.mapr.drillodbc.iniconfiguration file in a text editor. - Set the LogLevel key to zero (
0). - Save the
.mapr.drillodbc.iniconfiguration file. - Restart your ODBC application to make sure that the new settings take effect.
Windows Platforms
On Windows, logging is available in the Windows ODBC Data Source Administrator where you created the DSN. You must run C:\Windows\SysWOW64\odbcad32.exe to access and modify 32-bit DSNs on 64-bit Windows.
Enable Logging
To enable logging:
-
Click Start, All Programs, and then click the program group corresponding to the driver.
-
Select the DSN for which you want to log activity.
-
Click Configure.
-
In the DSN Setup dialog box, click Logging Options.
- From the Log Level drop-down list, select the logging level corresponding to the amount of information that you want to include in log files.
-
In the Log Path (or Log Directory) field, specify the full path to the folder where you want to save log files.
- If necessary (for example, if requested by a Support team), type the name of the component for which to log messages in the Log Namespace field. Otherwise, do not type a value in the field.
-
Click OK to close the Logging Options dialog box.
-
Click OK to save your settings and close the DSN Configuration dialog box. Configuration changes will not be saved of picked up by the driver until you have clicked OK in the DSN Configuration **dialog box. Click **Cancel (or the X button) to discard changes.
- Restart the application to make sure that the new settings take effect. Configuration changes will not be picked up by until the application reloads the driver.
Disable Logging
To disable logging:
- Select the DSN.
- Click Configure.
- Click Logging Options.
- From the Log Level drop-down list, select LOG_OFF.
- Click OK.
- Restart your ODBC application to make sure that the new settings take effect.
Driver Manager Tracing
The driver manager trace facility, is a useful way to troubleshoot ODBC driver issues.You can choose from several driver managers, depending on which platform you use.
Important
Tracing is active only for applications started after tracing has started. Currently-executing applications will not have tracing enabled. You must restart applications to enable tracing. You may need to restart services for applications, or you may have to restart the machine to properly enable tracing.
OSX and Other Non-Windows Platforms
iODBC is the default driver manager on OSX and can sometimes be found on other non-Windows platforms.
Enable Trace Logging
To enable trace logging:
- Locate your
maprdrill.odbc.inifile. This often located in your home directory. It might be a hidden file. -
Open the file and add the following key-value pairs under the section heading [ODBC]. If the heading does not exist, add it. For example:
[ODBC]Trace=1TraceFile=/path/to/file/traceFile.log[ODBC Data Sources]
Disable Trace Logging
When the trace is complete, disable tracing because tracing will consume disk space and significantly impact performance.
- Locate your
maprdrill.odbc.inifile. This often located in your home directory. It might be a hidden file. -
Open the file and add the following key-value pairs under the section heading [ODBC]. For example:
[ODBC]Trace=0TraceFile=/path/to/file/traceFile.log[ODBC Data Sources] - (Again, this action will only impact applications that have just started, not currently-executing applications.) Restart your application.
OSX and Other Non-Windows Platforms
Enable Trace Logging
To enable tracing on Windows:
- Open the ODBC Data Source Administrator.
- Go to the Tracing tab.
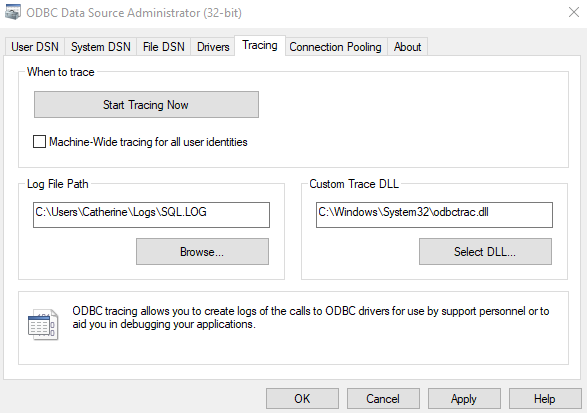
-
Change the Log File Path field to be the location and name of the file to which you’d like to write the trace entries.
-
(Optional) Check Machine-wide tracing for all user identities if you want the tracing to affect all users on the machine. If you are unsure, check this box.
-
Press Start Tracing Now.
Disable Trace Logging
When the trace is complete, disable tracing because tracing will consume disk space and significantly impact performance.
- Open the ODBC Data Source Administrator.
- Go to the Tracing tab.
- Press Stop Tracing Now. (Again, this action will only impact applications that have just started, not currently-executing applications.)
- Restart your application.
For more information about generating ODBC traces, see How To Generate an ODBC Trace with ODBC Data Source Administrator.