You can generate reports in Tableau using ODBC connections to Drill data
sources on Windows. Each example in this section takes you through the steps to create a
DSN to a Drill data source and then access the data in Tableau 8.1.
This section includes the following examples:
- Connecting to a Hive table
- Using a view to connect to Hbase table data
- Using custom SQL to connect to data in a Parquet file
The steps and results of these examples assume pre-configured schemas and
source data. You define schemas by configuring storage plugins on the Storage
tab of the Drill Web UI. Also, the examples assume you enabled the DECIMAL data type in Drill.
Example: Connect to a Hive Table in Tableau
To access Hive tables in Tableau 8.1, connect to the Hive schema using a DSN
and then visualize the data in Tableau.
Note
This example assumes that there is a schema named hive.default which contains a table named student_hive.
Step 1: Create a DSN to a Hive Table
In this step, we will create a DSN that accesses a Hive table.
- To launch the ODBC Administrator, click Start > All Programs > MapR Drill ODBC Driver 1.0 (32|64-bit) > (32|64-bit) ODBC Administrator.
The ODBC Data Source Administrator window appears.
- On the System DSN tab, click Add.
- Select MapR Drill ODBC Driver and click Finish.
The MapR Drill ODBC Driver DSN Setup window appears.
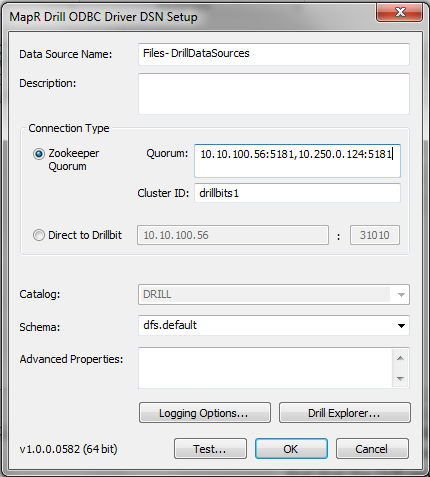
- Enter a name for the data source.
- Specify the connection type based on your requirements. The connection type provides the DSN access to Drill Data Sources.
In this example, we are connecting to a Zookeeper Quorum. Verify that the Cluster ID that you use matches the Cluster ID in
<DRILL_HOME>/conf/drill-override.conf.
- In the Schema field, select the Hive schema.
In this example, the Hive schema is named hive.default.
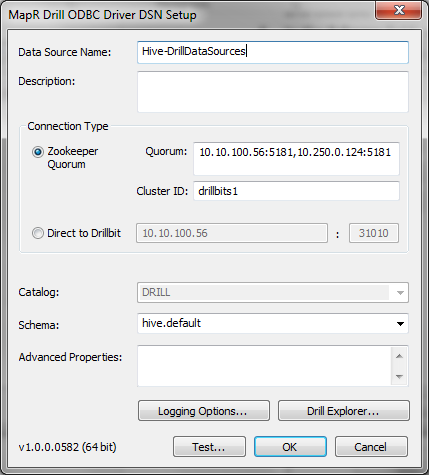
- Click OK to create the DSN and return to the ODBC Data Source Administrator window.
- Click OK to close the ODBC Data Source Administrator.
Step 2: Connect to Hive Tables in Tableau
Now, we can connect to Hive tables.
- In Tableau, click Data > Connect to Data.
- In the On a server section, click Other Databases (ODBC).
The Generic ODBC Connection dialog appears.
- In the Connect Using section, select the DSN that connects to the Hive table.
-or-
To create a connection without an existing DSN, select the Driver option,
select the MapR Drill ODBC driver from the list and click Connect. Then,
configure the connection to the Hive table and click OK.
- In the Schema field, select the Hive schema.
In this example, the Hive schema is named hive.default.
- In the Table section, verify that Single Table is selected and then click the Search icon.
A list of tables appears.
- Select the table from the list and click Select.
In this example, the table name is student_hive.
- Click OK to complete the connection.

- In the Data Connection dialog, click Connect Live.
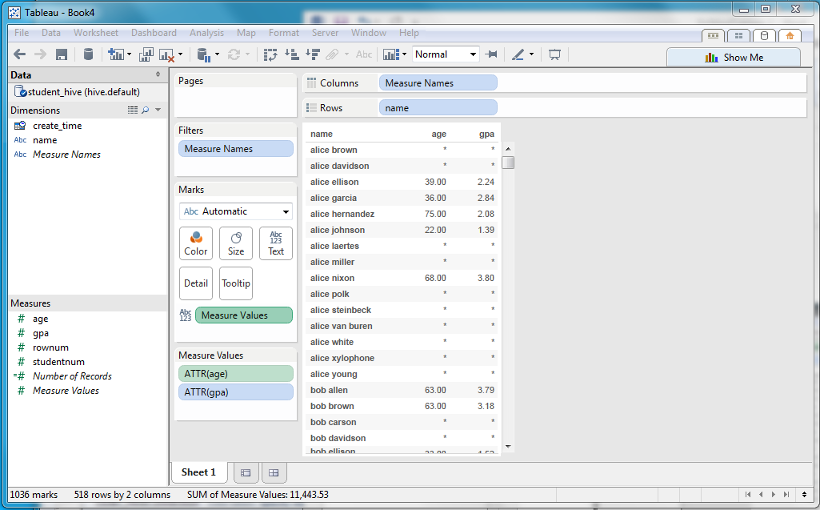
Step 3. Visualize the Data in Tableau
Once you connect to the data, the columns appear in the Data window. To
visualize the data, drag fields from the Data window to the workspace view.
For example, you can visualize the data in this way:
Example: Connect to Self-Describing Data in Tableau
You can connect to self-describing data in Tableau in the following ways:
- Use Drill Explorer to explore the self-describing data sources, create a Drill view, and then use ODBC to access the view in Tableau as if it were a table.
- Use Tableau’s Custom SQL to query the self-describing data directly.
Option 1. Using a View to Connect to Self-Describing Data
The following example describes how to create a view of an HBase table and
connect to that view in Tableau 8.1. You can also use these steps to access
data for other sources such as Hive, Parquet, JSON, TSV, and CSV.
Note
This example assumes that there is a schema named hbase that contains a table named s_voters and a schema named dfs.default that points to a writable location.
Step 1. Create a View and a DSN
In this step, we will use the ODBC Administrator to access the Drill Explorer
where we can create a view of an HBase table. Then, we will use the ODBC
Administrator to create a DSN that connects to the view.
- To launch the ODBC Administrator, click Start > All Programs > MapR Drill ODBC Driver 1.0 (32|64-bit) > (32|64-bit) ODBC Administrator.
The ODBC Data Source Administrator window appears.
- On the System DSN tab, click Add.
- Select MapR Drill ODBC Driver and click Finish.
The MapR Drill ODBC Driver DSN Setup window appears.
- Specify the Connection Type based on your requirements.
The connection type provides the DSN access to a Drillbit. For more
information, see Connection Type.
- Click Drill Explorer to start exploring the data.
The Drill Explorer dialog appears. You can use the Browse tab to visually
explore the metadata and data available from Drill data sources. Advanced
users can use SQL tab to type in SQL manually to explore the data and save the
SQL query as a view.
- Select the schema that you want to create a view for.
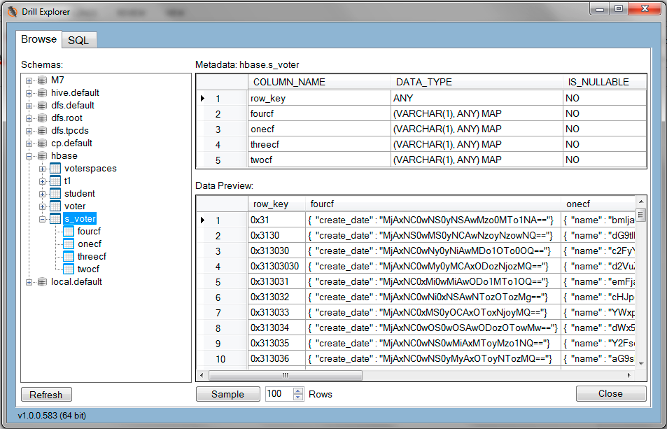 Drill Explorer displays the metadata and column families for the selected
HBase table.
Drill Explorer displays the metadata and column families for the selected
HBase table.
- To create a view of the HBase table, click the SQL tab.
By default, the View Definition SQL field contains: `SELECT * FROM
.`
8. To create the view, enter SQL in the _View Definition SQL_ section and then click **Preview** to verify that the results are as expected.

In this example, the following SQL was entered:
SELECT cast(row_key as integer) voter_id, convert_from(voter.onecf.name,
'UTF8') name, cast(voter.twocf.age as integer) age,
cast(voter.twocf.registration as varchar(20)) registration,
cast(voter.threecf.contributions as decimal(6,2)) contributions,
cast(voter.threecf.voterzone as integer)
voterzone,cast(voter.fourcf.create_date as timestamp) create_time FROM
hbase.voter
HBase does not contain type information, so you need to cast the data in Drill
Explorer. For information about SQL query support, see the [SQL Reference](/docs/sql-reference).
9. To save the view, click **Create As**.
10. Specify the schema where you want to save the view, enter a name for the view, and click **Save**.
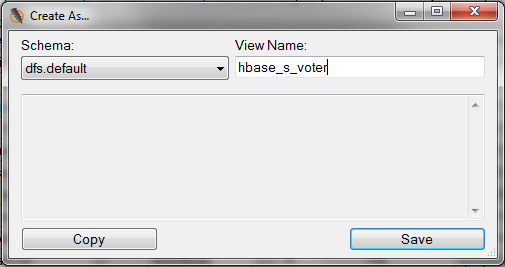
11. Close the Drill Explorer to return to the _MapR Drill ODBC Driver DSN Setup _window.
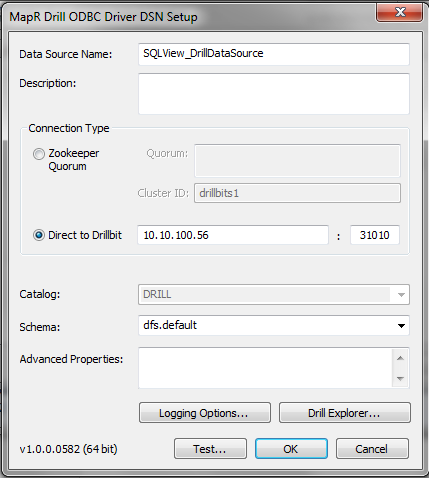
Now that we have created the view, we can create a DSN that can access the
view.
12. Enter a data source name and select the schema where you saved the view.
In this example, we saved the view to dfs.default.
13. Click **OK** to create the DSN and return to the _ODBC Data Source Administrator_ window.
14. Click **OK** to close the ODBC Data Source Administrator.
#### Step 2. Connect to the View from Tableau
Now, we can connect to the view in Tableau.
1. In Tableau, click **Data > Connect to Data**.
2. In the *On a server* section, click **Other Databases (ODBC)**.
The *Generic ODBC Connection* dialog appears.
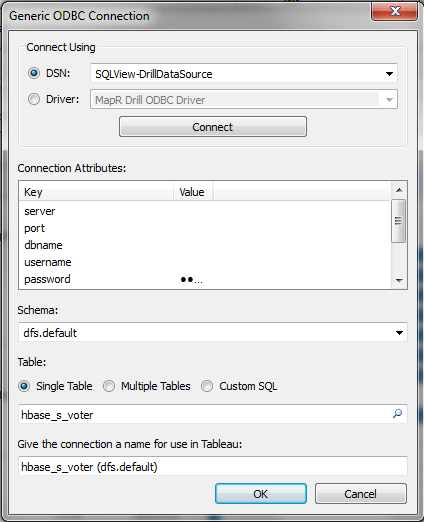
3. In the *Connect Using* section, select the DSN that connects to the schema that contains the view that you created.
-or-
To create a connection without an existing DSN, select the **Driver** option, select the **MapR Drill ODBC Driver** from the list and click **Connect**. Then, configure the connection using the steps in step 1 and click **OK**.In this example, we created SQLView-DrillDataSource to access the view.
4. In the **Schema** field, select the schema that contains the views that you created in Drill Explorer.
In this example, we saved the view to the dfs_default schema.
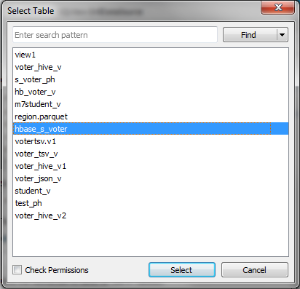
5. In the *Table* section, verify that **Single Table** is selected and then click the Search icon.
A list of views appears.
6. Select the view from the list and click **Select**.
In this example, we need to select hbase_s_voter.
7. Click **OK** to complete the connection.
8. In the _Data Connection dialog_, click **Connect Live**.
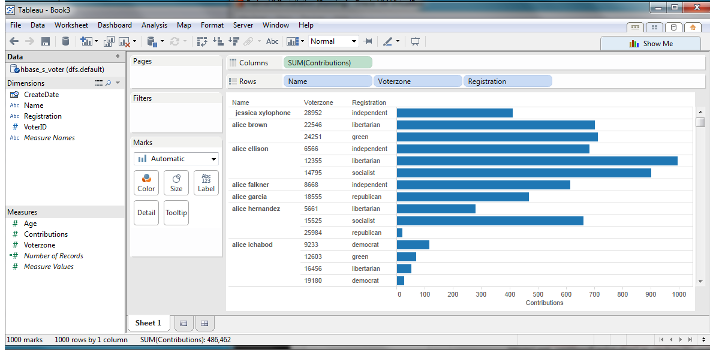
#### Step 3. Visualize the Data in Tableau
Once you connect to the data in Tableau, the columns appear in the Data
window. To visualize the data, drag fields from the Data window to the
workspace view.
For example, you can visualize the data in this way:
### Option 2. Using Custom SQL to Access Self-Describing Data
The following example describes how to use custom SQL to connect to a Parquet
file and then visualize the data in Tableau 8.1. You can use the same steps to
access data from other sources such as Hive, HBase, JSON, TSV, and CSV.
Note
This example assumes that there is a schema named dfs.default which contains a parquet file named region.parquet.
#### Step 1. Create a DSN to the Parquet File and Preview the Data
In this step, we will create a DSN that accesses files on the DFS. We will
also use Drill Explorer to preview the SQL that we want to use to connect to
the data in Tableau.
1. To launch the ODBC Administrator, click **Start > All Programs > MapR Drill ODBC Driver 1.0 (32|64-bit) > (32|64-bit) ODBC Administrator.**
The *ODBC Data Source Administrator* window appears.
2. On the **System DSN** tab, click **Add**.
3. Select **MapR Drill ODBC Driver** and click **Finish**.
The *MapR Drill ODBC Driver DSN Setup* window appears.
4. Enter a data source name.
5. Specify the connection type based on your requirements. See [Connection Type](/docs/configuring-connections-on-windows/#connection-type) for more information.
The connection type provides the DSN access to a Drillbit.
In this example, we will connect to a Zookeeper Quorum.
6. In the *Schema* section, select the schema associated with the data source that contains the Parquet file that you want to access. Then, click **OK**.
In this example, the Parquet file is available in the dfs.default schema.
You can use this DSN to access multiple files from the same schema.
In this example, we plan to use the Custom SQL option to connect to data in Tableau. You can use Drill Explorer to preview the results of custom SQL before you enter the SQL in Tableau.
7. If you want to preview the results of a query, click **Drill Explorer**.
1. On the **Browse** tab, navigate to the file that you want.
2. Click the **SQL** tab.
The SQL tab will include a default query to the file you selected on the Browse tab. You can use the SQL tab to preview the results of various queries until you achieve the expected result.
3. Enter the query that you want to preview and then click **Preview**.
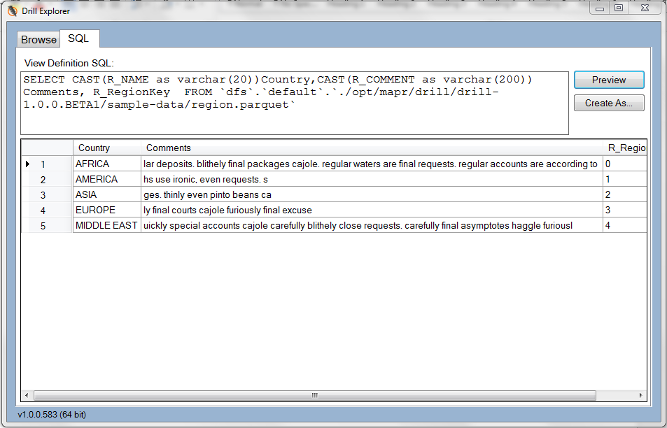
You can copy this query to file so that you can use it in Tableau.
4. Close the Drill Explorer window.
8. Click **OK** to create the DSN and return to the _ODBC Data Source Administrato_r window.
9. Click **OK** to close the ODBC Data Source Administrator.
#### Step 2. Connect to a Parquet File in Tableau using Custom SQL
Now, we can create a connection to the Parquet file using the custom SQL.
1. In Tableau, click **Data > Connect to Data**.
2. In the *On a server* section, click **Other Databases (ODBC).**
The *Generic ODBC Connection* dialog appears.
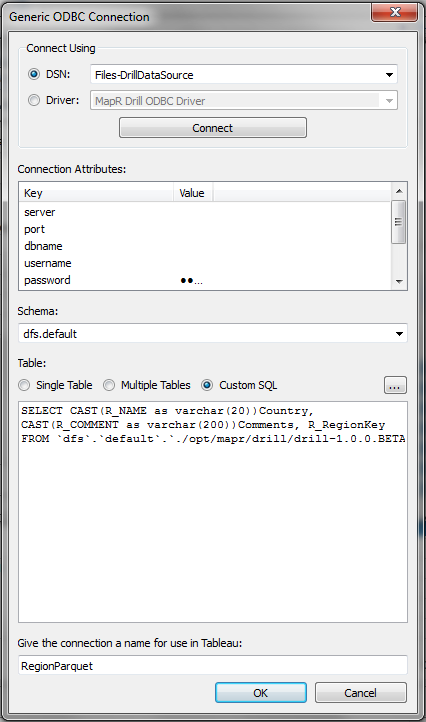
3. In the *Connect Using* section, select the DSN that connects to the data source.
In this example, Files-DrillDataSources was selected.
If you do not see the DSN, close and re-open Tableau.
4. In the *Schema* section, select the schema associated with the data source.
In this example, dfs.default was selected.
5. In the *Table* section, select **Custom SQL**.
6. Enter the SQL query.
In this example, the following SQL query was entered:
SELECT CAST(R_NAME as varchar(20))Country,
CAST(R_COMMENT as varchar(200))Comments, R_RegionKey
FROM `dfs`.`default`.`./opt/mapr/drill/drill-1.0.0.BETA1/sample-data/region.parquet`
Note
The path to the file depends on its location in your file system.
7. Click **OK** to complete the connection.
8. In the *Data Connection dialog*, click **Connect Live**.
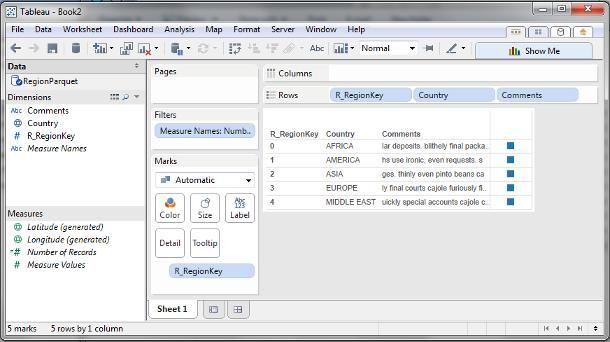
#### Step 3. Visualize the Data in Tableau
Once you connect to the data, the fields appear in the Data window. To
visualize the data, drag fields from the Data window to the workspace view.
For example, you can visualize the data in this way: