
Using Apache Drill with Tableau 9 Desktop
This document describes how to connect Tableau 9 Desktop to Apache Drill and explore multiple data formats instantly on Hadoop. Use the combined power of these tools to get direct access to semi-structured data, without having to rely on IT teams for schema creation.
To use Apache Drill with Tableau 9 Desktop, complete the following steps:
- Install the Drill ODBC driver from MapR.
- Install the Tableau Data-connection Customization (TDC) file.
- Connect Tableau to Drill Using ODBC.
- Query and analyze various data formats with Tableau and Drill.
Step 1: Install and Configure the MapR Drill ODBC Driver
Drill uses standard ODBC connectivity to provide easy data-exploration capabilities on complex, schema-less data sets. For the best experience use the latest release of Apache Drill. For Tableau 9.0 Desktop, Drill Version 0.9 or higher is recommended.
Complete the following steps to install and configure the driver:
- Download the 64-bit MapR Drill ODBC Driver for Windows from the following location:
http://package.mapr.com/tools/MapR-ODBC/MapR_Drill/ Note: Tableau 9.0 Desktop 64 bit can use either the 32-bit driver or the 64-bit driver. - Install the ODBC driver on Windows.
- Configure the driver.
- If Drill authentication is enabled, select Basic Authentication as the authentication type. Enter a valid user and password.
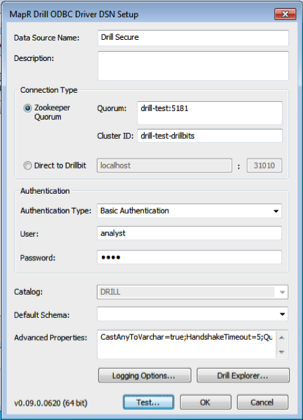
Note: If you select ZooKeeper Quorum as the ODBC connection type, the client system must be able to resolve the hostnames of the ZooKeeper nodes. The simplest way is to add the hostnames and IP addresses for the ZooKeeper nodes to the %WINDIR%\system32\drivers\etc\hosts file. 
Also make sure to test the ODBC connection to Drill before using it with Tableau.
Step 2: Install the Tableau Data-connection Customization (TDC) File
The MapR Drill ODBC Driver includes a file named MapRDrillODBC.TDC. The TDC file includes customizations that improve ODBC configuration and performance when using Tableau. The MapR Drill ODBC driver installer automatically installs the TDC file if the installer can find the Tableau installation. If you installed the MapR Drill ODBC driver first and then installed Tableau, the TDC file is not installed automatically. You must install the TDC file manually.
To install the MapRDrillODBC.TDC file manually:
-
Click Start, and locate the Install Tableau TDC File app that the MapR Drill ODBC Driver installer installed. For example, on Windows 8.1 in Apps, the Install Tableau TDC File appears under MaprDrill ODBC Driver:
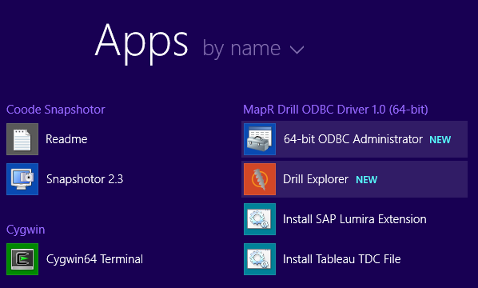
- Click Install Tableau TDC File.
- When the installation completes, press any key to continue. For example, you can press the SPACEBAR key.
If the installation of the TDC file fails, this is likely due to your Tableau repository being in location other than the default one. In this case, manually copy the My Tableau Repository to C:\Users<user>\Documents\My Tableau Repository. Repeat the procedure to install the MapRDrillODBC.TDC file manually.
Step 3: Connect Tableau to Drill via ODBC
Complete the following steps to configure an ODBC data connection:
To connect Tableau to Drill use the following steps:
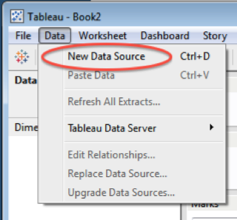
- In a Tableau Workbook click Data > New Data Source.
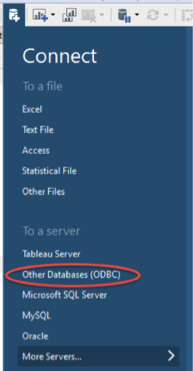
- In the Connect list, select Other Databases (ODBC).
- On the Server Connection window, select the DSN configured in Step 1 from the drop-down list of ODBC data sources. Then click Connect. Note: You will be prompted to enter a username and password; these entries will be passed to the Server Connection window.
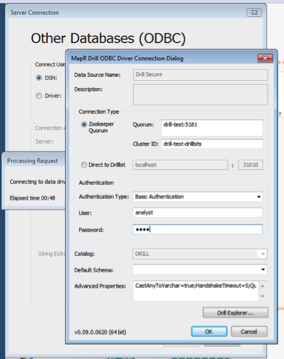
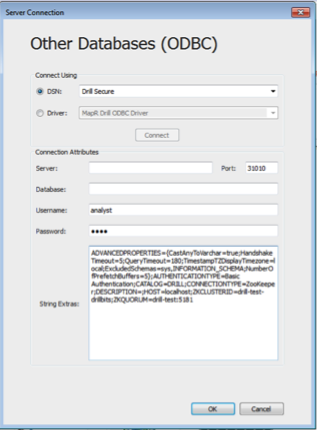 Tableau is now connected to Drill, and you can select various tables and views.
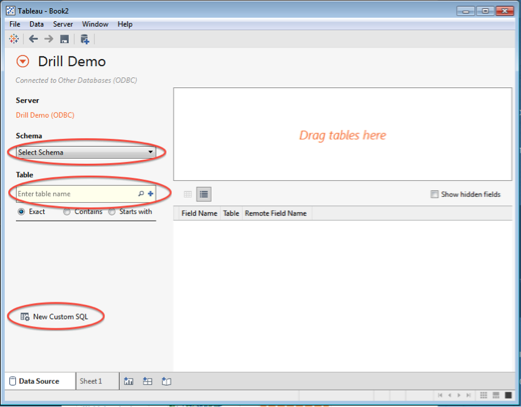
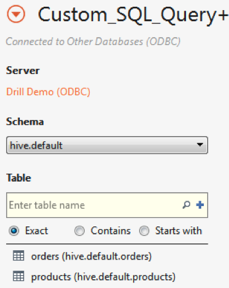
- Click the Schema drop-down list and choose a schema by clicking the search icon: all available Drill schemas will be displayed. When you have selected the schema, click the search icon in the Table dialog box: all available tables or views will be displayed.
You can select tables and views to build a Tableau Visualization. You can also use custom SQL by clicking the New Custom SQL option.
Tableau can natively work with Hive tables and Drill views. For Drill data sources, including directly accessible file systems or HBase/MapR-DB tables, you can either use the Custom SQL option, or you can create a view in Drill to easily represent the complex data to Tableau. For more information, refer to the following pages:
- https://drill.apache.org/docs/using-drill-with-bi-tools/
- http://drill.apache.org/docs/tableau-examples/
Note: If Drill authentication and impersonation is enabled, only the views that the user has access to will be displayed in the Table dialog box. Also, if custom SQL is being used to try and access data sources that the user does not have access to, an error message will be displayed. 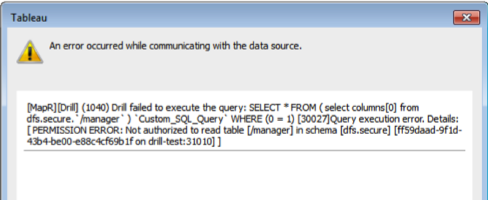
Step 4: Query and Analyze the Data
Tableau Desktop can now use Drill to query various data sources and visualize the information.
Assume that a retailer has weblog data stored as JSON files in a nested directory structure and product information stored in a Hive table. Using Drill and Tableau, users would like to understand the volume of product sold by state and product category.
-
Using the New Custom SQL function in Tableau, write a Drill query to read the JSON files without the need for ETL. Casting data types is recommended when you are working directly with files. For example:
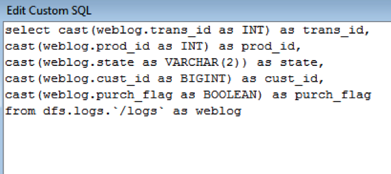
-
Next select the Hive products table:
- Verify that Tableau is joining the two data sources (JSON files and Hive table) on the prod_id key:
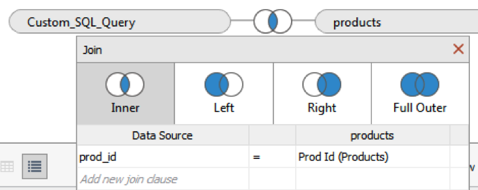 The data sources are now configured and ready to be used in the visualization.
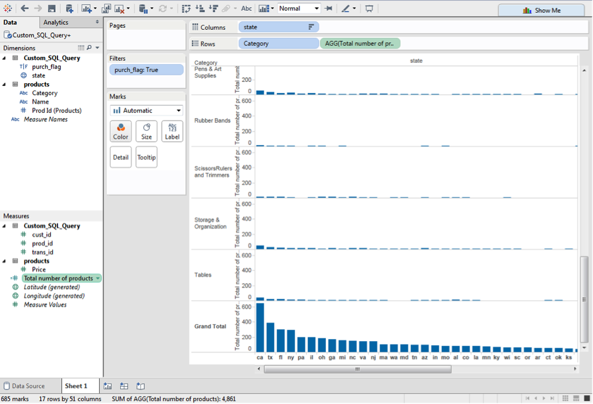
 - Drag State from the Custom SQL (JSON files) to Columns, and drag Category from the Hive products table to Rows.
- Create a calculated field called
Total Number of Productsand entercount(prod_id)for theprod_idfield from the weblog files (Custom SQL), then drag it to Rows next to Category. The visualization will now show the total products by category and state. - To filter out weblog data where products were not bought, drag the
purch_flagfield from the weblog files to Filters. Select only data where thepurch_flagwas true. - Finally, order the data from the state with the most products sold to the one with the least.
- Add a grand total row by clicking Analysis > Totals > Show Column Grand Totals.
In this quick tutorial, you saw how you can configure Tableau Desktop 9.0 to work with Apache Drill.